I used
embroidery floss samples this weekend to make a few friendship bracelets. For the first time, I might add. When I was a kid,
shoe pins were all the rage instead of bracelets at my school. I've never made a knotted bracelet before, but since little girls can do it, it would be embarrassing if I couldn't figure it out, right?
Purl Soho's
tutorial and
Friendship-bracelets.net taught me everything I needed to know. Check out the
gallery here for some amazing work. That site has 23,000 patterns. Holy smokes!
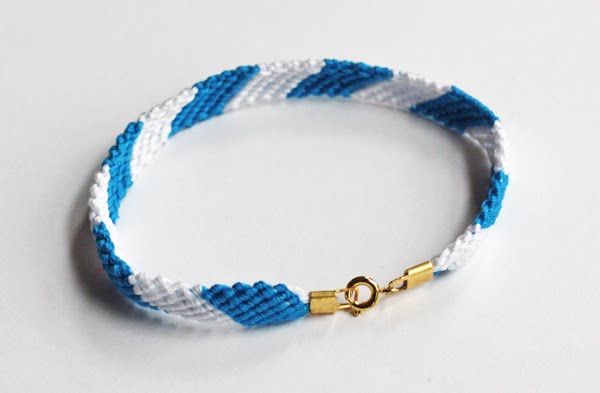
I wanted my bracelets to be easily put on and taken off without having to tie them in the traditional way. None of this "leave it on until it falls off" business. That's probably friendship bracelet blasphemy, but so be it.
I like a more polished finish instead of ratty dangling threads. I went to my local hobby store and got some jewelry clasps which are easy to add.
For wider bracelets (10+ strings), a wide crimp connector can work well. A narrower fold-over crimp-head clasp can also do the job. If your clasp doesn't have an attached jump ring, you might need a couple of those, too. And finally, a lobster clasp or a spring-ring clasp will hook the whole deal together.
To use the wider clamp version, cut the loose threads off both ends of the bracelet.
Add a little glue to hold the threads together at the end and work it in with your fingers. I used Aleene's Tacky Glue. After the glue dries for 5 minutes or so, push the end of the bracelet inside the clamp. Then press the metal closed with a pliers. The clamp has tiny teeth that dig into the thread so it won't come apart.
Use a couple jump rings if needed and add the clasp of your choice.
Or, try a fold-over crimp clasp. Cut the loose threads off your bracelet, leaving about a quarter inch. Roll some glue around with your fingers until the loose threads are twisted together. When the glue is dry, trim off any excess length and insert the end into the clasp. With a pliers, fold over one flap of the clasp, then fold the other on top of it and squeeze. Add the closure of your choice.
You can get these jewelry findings at bead stores or all over Etsy.com in the supplies section.


47 comments:
Wow! You did it! Not quite what I was expecting... haha. No, much fancier!! Very nice!
And I never thought I'd be saying this... but thanks for putting those stinkety (Larissa's word) verification words back on. Whew! Now let's see whether I'm a robot or not....
Mum
What were you expecting, Mum?
Yeah, the spam had to be dealt with. Argh. Just deleted 600+ spam comments that piled up over the last couple days.
Those clasps definitely make embroidery floss bracelets that much prettier! I'm definitely going to use clasps from now on. Thank you for this tutorial!
Oh, maybe the elementary school version. ;)
It's funny - all of your pics show what I would consider to be the back of the bracelet as the front. Maybe it's just a preference on how you like the knots to look? Either way, the added clasps look awesome!
We were obsessed with those pins as well, but we called them 'friendship pins' and put them on everything, not just shoes. I still have one hanging off a purse zipper somewhere. Oh and they had to be tiny pins. None of that large stuff.
I like the clasps on friendship bracelets. I made a lot of those in school (and even now), so I think this upgrades them perfectly. Ditto on the backwards comment. I view the inside of your bracelets as the front, too.
Were you reading my mind? Making friendship bracelets, learing about it and visiting those websites is exactly what I was "discovering" last week!
very nice. i don't like the dangling ties either, and have been thinking about trying to incorporate a button + loop into the structure, but this is way more stylish.
Those look so nice! A grown-ups version of a kid's favorite. :)
Genius! I also eschew the "leave it on until it falls off" wearing habit, and only really like very light bracelets, so this is a life-saver. And, of course, a "duh, why didn't I think of that" moment. Thanks!!
Hi guys,
I liked the back side better since the edges curled ever so slightly and it made the bracelet look a bit more convex instead of concave. More bracelet-y. But they can be reversed and worn with the right side out, of course. I guess I like backwards things.
Mum has always complained that I twist the tie on bread bags backwards. Looks like we've just found another backwards thing. :)
Yep, that's the truth! There have been other goofy little things over the years, but I can't think of any right offhand. The bread twist ties is the most noted thing... I always knew when she'd been the last one in the bread sack. :)
wow, you've turned these into something so elegant...instead of something I have to remove at the end of a camping trip!
So that's how it's done. Good work! Now I gotta get me those clasps.
I'm with Tharvey - that's the back! But I'm impressed that you've found a solution to the dangly threads problem. And thanks for the reminder about shoe pins! A girl from another school who was in my Saturday piano duet class used to have zillions of those on her shoes. She was a bit fancy, though, so she had them in co-ordinating pastel shades to match her shoes and socks, if I remember rightly.
Thanks for showing how to make these bracelets look so much more sophisticated!
I like them so much better with the clasps! Nice tuto, tahnks for sharing and big hugs from Sweden! :)
Who are you giving them to? Does Grandma G get one?
I want to pull up a chair at your craft table! This is such a great idea. I like the idea of quick release rather than tied on so much better. Clever you!
Since my 13 year old runs a one-girl friendship bracelet sweat factory out of her family room, I know she will love this post! Thanks you!
Ha, sounds like the poor thing is working her fingers to the bone. Make sure she stops for adequate food and sleep sometimes!
Wow! The coming of age for friendship bracelets. Very classy finish. This is a simple but brilliant idea!
AWESOME! I can't believe that something as basic as a run to the store and getting some clasps would be the solution. D'oh!
don't worry. i am 40 and I still make friendship bracelets. one each day, see on http://steigmann.wordpress.com
Wow, that's great!
Now why didn't I think of that? I was just contemplating trying to make a friendship bracelet but was put off a little by the tie ends all the instructions shows. No excuse not to try it now. Thanks!
I always attach toggles instead of clasps on friendship bracelets and they work great. They're much easier for the wearer to secure themselves.
where do you think can i buy those clasps?..
Bead or jewelry supply stores, or try Michael's or Hobby Lobby. Or search Etsy.com for supplies.
Can I ask a question? Where did u buy the crimp connector? I've been looking for it at the mall but i can't find them anywhere.
I bought mine at Tom Thumb craft store in Evanston, IL. You could search a local bead store or Etsy.com online where there are lots of jewelry supplies.
Where can you find the clasps/clamps & jump rings found here? Have just started making bracelets.
Where can you find the clasps/clamps & jump rings? Have looked at the sites mentioned here with negative results.
Jenny, you can try a local craft store like Michaels if you live in the US or shop at Etsy:
Crimp connectors
Lobster clasps
Jump rings
I remember the friendship pins! We used to put them on the band of our "Swatch" watches!! That was back in the late 80's/early 90's!!
What's the name of this kind of clasp?
Thanks
Not sure... I'd call it a crimp clasp, I guess.
How do you go about connecting the foldover crimp clasps to the spring ring or lobster clasps? New at this and this blog isn't very beginner-friendly IMO. I am frustrated... :(
Depending on the clasp, you might need a "jump ring" to connect the two. It's a circle with a slit in it. (Shown in the photo of hardware between the lobster clasp and the crimp connector.)
Twist the slit apart, string on the other parts, and flatten the circle closed with a pliers. Here's a video:
http://www.youtube.com/watch?v=n2OihVBhCes
Does anyone know if it's possible to cut a wide crimp connector? I bought some that ended up being too big, and I don't want to waste them
These are so cool! Do you think this would work with Rex Lace?
I don't know what that is!
Fact: This is useful.
thank you so much for share with us like this tips
Do you ever have problems with the clasps pulling off after people wear them for awhile?
Do you have a link to a place where I can get the clasps? I love the idea though ;)
Is it possible to make the bracelet WITHOUT the Fold-Over Crimp Clasp? I have everything except the crimps and I was wondering if I can make it with the clasps and bracelet.
, ,
Post a Comment