How About Orange
Showing posts sorted by relevance for query a DIY. Sort by date Show all posts

June 27, 2013

DIY foil cards: a better method

DIY metallic foil cards
Yesterday I wrote about my ongoing experiments with laser transfer foil and an iron. Results were hit or miss. A lot of miss, actually. I'd been curious what would happen if, instead of fusing the foil to a laser print with my iron, I used my printer to do it (a Brother HL-5250DN). A representative from the company where I ordered the foil, PulsarPro FX, said a laser printer probably wouldn't work for a variety of reasons. They recommend a particular kind of laminator, but I've been too cheap to buy one. Last night I figured I'd try the printer anyway and crossed my fingers that the foil wouldn't get jammed up inside. The verdict: it worked WAY better than an iron.

I have a multi-colored pack of foils— click here and scroll down to "Foil Sampler Pack." That's the one. Or you could buy the "Individually Wrapped TRF" if you want to save some money and just get one color to test first, which is how I started. If you're outside the US, start here to find a vendor, then choose your product.

Here's the process.

First I requested Alex's permission to possibly destroy our printer. Got it, with just a "please be careful" admonishment.

How to make DIY metallic foil cards
Then I made a design in Illustrator and laser printed it on cardstock.

How to make DIY metallic foil cards
Next I cut a piece of foil and laid it over the design. I taped all the way along the edge that goes into my printer first and put a shorter piece on the other two corners to hold them down. Hard to see here, sorry.

Tips: Make sure the foil is cut large enough that your tape doesn't cover any part of your design or you'll probably have trouble getting the foil to stick in that area. Make sure you don't get wrinkles in the foil; smooth it down down when taping.

How to make DIY metallic foil cards
I put the taped-up cardstock back in my printer tray, positioned as if I were going to reproduce the print again on the same side. But this time, I printed a blank document. As the cardstock ran through the printer again, the foil became fused to any toner on the page.

How to make DIY metallic foil cards
Then I peeled off the loose foil; it only sticks where there's toner. The print above isn't too shabby.

How to make DIY metallic foil cards
But this here print IS shabby. And not in a chic way. I found that some cardstock works and some doesn't. No idea why; so aggravating. Update: Coated cardstock yields good results! Uncoated cardstock does not.

How to make DIY metallic foil cards
My white cardstock worked really well. Here's a print with copper foil adhered in a confetti design, inspired by that trend in metallic wall treatments.

Metallic foil card tutorial at How About Orange
Here's more copper in a houndstooth pattern.

DIY metallic foil card by Jessica Jones
Here's an origami unicorn I designed for another project, foiled in red. Fabulous!

So no more ironing. I'm using the laser printer from now on.

May 17, 2011

Photography DIY: how to make your own bokeh shapes

I've seen photos created using a DIY camera trick and couldn't resist testing it myself. Bokeh is the term for the out-of-focus areas in a photo, particularly those little highlights created when photographing small points of light. Usually those highlights are circles or polygons, but it's lots of fun to make your own shapes.

You'll need a DSLR camera and a lens with a large aperture. I'm definitely no photography expert, so refer to this good article for info about lenses and settings for taking shots with bokeh. I used my Canon Digital Rebel XSi with a Canon 50mm f/1.8 lens (this is my only extra lens; it's relatively cheap, lens-wise, and I love it).

You'll also need a piece of black paper, pencil, scissors, tape, and a craft knife or decorative paper punch.

Cut a strip of paper long enough to wrap around your lens. I made mine 10" x 1.5". I put a strip of tape along the entire length of one edge so it would be easy to peel pieces of tape off this smooth area, just in case I wanted to switch my shape cutouts later. Wrap the paper strip around the outside of your camera lens to form a cylinder and secure it with tape.

Then set this paper tube on a piece of black paper and trace around it. Cut out the circle. This will be the cap on the paper tube that fits over your lens. Use a paper punch or Xacto knife to cut a hole in the middle of the circle. Make the shape somewhere between 1/2" and 3/4".

I used a knife to cut a cloud, asterisk, and tulip. Tape the paper circle to the tube to form a cap that will fit neatly over your lens.

To test this little project, I needed some tiny points of light, so I threw some Christmas lights on a clothes rack (in daylight, but nighttime shots are cool, too). Then I fitted my paper cap over the lens and made sure my aperture was open as far as it would go.

Focusing on my finger held right in front of my camera caused the background to go out of focus. I moved my finger away, took the photo, and got this:

Success!

Putting an object in the foreground is fun, too. I totally amused myself and recommend you try this.

November 15, 2007

I hate "Crafting"

I have to get something off my chest. The word "crafting" makes me squirm in distaste. As in, "I'm going to do some crafting now." I realize this is an inflammatory statement, and I'm honestly sorry if I've offended anyone. I imagine I'll dig myself into an even bigger hole here as I go on, and I'm going to start sounding snobbier by the second.

Here's the deal. Over time, I've realized I've begun to equate "crafts" and "crafting" with things that are not my style whatsoever. Like knitted tea cozies and wooden clothespin angels covered with glitter and silk flowers hot glued onto wreaths and pencil cups made out of popsicle sticks. Not so hip. When I hear "craft," I envision stuff like that. (Now certainly there could be outstanding examples of those items that are truly beautiful, and if you've ever made anything of the sort, I'm sure yours is fantastic and not the sort of thing I'm picturing.

I tend to avoid using the word "craft" on this blog, unless it's a cold, calculated attempt to get Google to list me when someone searches for a "craft" project. Or when I can't think of a better word. (And if I've ever linked to your project, that means I like it and it passed the coolness test in my head, even if I've referred to it as a craft.) Every single time I've used a form of this nasty word (another instance here), I grit my teeth. I'd rather say project, undertaking, do-it-yourself, or just plain "make something."

So let's talk about "DIY" (the handy little abbreviation for do-it-yourself). When pondering "DIY," I used to picture guys building stereos out of duct tape or constructing bar stools from recycled magazines and LED lights. Still not quite the thing I'm trying to find a word for, but at least it seems cooler and doesn't involve ruffles. But increasingly I'm seeing "DIY" used in nice places more popular with women, like Blueprint Magazine's blog, or Design*Sponge's "DIY Wednesday" posts. Doesn't a "decorative DIY project" sound so much more chic and modern than a "decorative craft project?" I think so.

I know this is all semantics. And I will probably continue to say "craft" occasionally in the future, at which time you will all pounce on me, especially the folks who truly love the term and feel mightily offended by the viewpoint I've expressed here. But unless anyone has a better word...

Down with "craft," up with "DIY," I say! What say you all?

September 07, 2011

How to "wallpaper" using fabric

I couldn't stand our boring white door anymore. Something had to be done. So over the weekend, we wallpapered it with a big, fun piece of fabric. I love it. And it's useful, too. There are four white doors in this corner of the apartment—bedroom, bathroom, coat closet, and outer door—and sometimes departing guests get confused about which one they came through. Now we'll just tell them to exit through the village.

This fabric is fairly thin cotton from IKEA. It's called Britten Hus and designed by someone named Emma Jones. No relation that I know of, but clearly someone I would like. She's also got this handwriting print which I adore. Someone should use it! Bed sheets would work really well for this project, too.

For this DIY fabric wallpaper project, you'll need water, cornstarch, a big brush (or a paint roller if you want to do a larger wall), scissors, and a craft knife if you have obstacles like we did.

First mix up your paste, since it will need time to cool. I made way too much, but better safe than sorry. I don't think I even used half of it, so you might want to cut this recipe down. I adjusted a bit to get a nice consistency that's thickened, but pourable. Like really thick gravy.

Boil 4 cups of water in a pot. Mix about 3/8 cup cornstarch with a little water in a small bowl until the powder is dissolved. Add the cornstarch mixture to the water slowly while stirring. Boil until thickened and then let it cool.

In the meantime, measure the area you want to wallpaper and cut your fabric to size. I just made a small cut in the edge of my fabric and tore each side, since I knew it would make a straighter line than I could cut. I trusted that the design was printed to be aligned with the grain.

Brush the entire door with paste, then begin applying fabric from the top down, adjusting and smoothing as you go. The paste is very forgiving and will allow you to smooth out wrinkles or peel a section back off and reposition it. If you need more paste in dry spots, just brush more on. It doesn't change the color of the fabric when it's dry.


Use a scissors or Xacto knife to cut around any obstacles. We made a few quick slits where the lock and doorknob were, just to get the fabric fitted over them so we could continue smoothing out the rest of the door. Then we went back and trimmed carefully around the hardware with a knife. We applied more paste to stick down the raw edges.

Finally, we went back around the sides of the door and brushed on a little extra paste to smooth down any loose threads and keep the raw ends from fraying. If you like, you can brush another coat of paste over the entire door, decoupage style. Our fabric was stuck down well enough and I liked the soft fabric texture, so I opted not to. If you use thicker fabric, it might be a good idea to glue it down a little better with a top coat, though.

Our end result was smooth and perfectly wrinkle free. Love it!

Here's the doorknob with still-damp fabric around it.

When you're tired of the fabric, just pull it off and your paint job is unharmed. You may need to use a damp sponge to wipe off any clear paste residue or thread stragglers. I'd also suggest machine washing brightly colored fabric first to make sure the dyes don't bleed when the fabric is moistened with paste—do a small test first.

Update: To show how the fabric peels off, I pasted another chunk onto my hallway wall, then pulled it off.

The fabric peeled off easily. In this case, the edge of the glued area showed slightly. After taking this photo, I went over it with a damp sponge to see if I could erase it, but that just made the faintly darker area larger. The slight discoloration is the result of getting the wall damp. The walls in my hallway have flat paint, which doesn't like wetness—it always shows every water drip and isn't very wipeable. I don't mind, since this part of the hallway is dim and it doesn't show. Or I can always wipe the whole wall with a moist sponge and it will all match, ha! I suspect if your paint finish is satin or semi-gloss, which are more wipeable, you won't have any issues at all.

So if your wall or door has flat paint, you might want to cover the entire surface with fabric so you don't see any discolored edges where the fabric starts and stops.

6/14/13 Update, two years later: I pulled all the fabric off the door. Super easy, and no need to repaint. Here's an action photo.

April 10, 2014

How to make an industrial pipe floor lamp


I really have a thing for lamps. I roam thrift stores admiring them— the weirder, the better — and pause on catalog pages with cool fixtures. Today I'm happy to share a guest tutorial on how to make your own industrial-style floor lamp out of pipes. Set this baby in front of your exposed brick wall and sip a craft cocktail while you admire your handiwork. You built a lamp!


The how-to is by Matthew Lyons, self-proclaimed handyman and blogger for HomeDaddys.com. Here's what Matthew has to say:

- - - - -
Like most red-blooded Americans, I love industrial pipe lighting. There’s a certain derelict nostalgia about lamps and chandeliers made from old metal plumbing that just makes me feel all warm and fuzzy and manly inside. Unfortunately, that feeling isn’t shared by my wallet.

I’ve been lusting after an industrial pipe floor lamp for years now but the price tags people attach to these things are utterly ridiculous. The majority of multi-bulb floor-length pipe lamps available online or in stores sell for $400 - $1,000. As a guy on a lower middle-class income with a wife and a kid to support, I just can’t justify spending that kind of money on what amounts to a few lengths of pipe, some wire and a couple vintage light bulbs.

So, considering how simple these things are, I figured I could just build my own pipe lamp for half the cost of buying one. Having never wired anything before in my life, I was a little worried how this project would turn out. Surprisingly, though, it was super-easy to make. The entire lamp can be assembled by hand like some sort of awesome adult Erector Set. As I predicted, the wiring was by far the hardest part of the entire build – but even that took less than two hours and I didn’t even set the house on fire when I plugged it in. This made my wife very happy.

Here’s how you can build one of these awesome industrial pipe lamps for your own house or apartment or office or whatever dark corner of your life begs illumination.

April 05, 2010

How to make your own deodorant

My weekend of celebrating with the folks was excellent. And sure enough, my mom (known to many of you as Grandma G) embarked on a DIY deodorant project. She came across someone selling homemade deodorant nearly a year ago, tried it out, and found that it actually kept stinkiness away better than store brands. Plus most popular brands of deodorant contain aluminum, so if you can avoid stuffing metal into your pores, that seems like a good idea. After using a few types of natural deodorants and figuring out which ingredients she prefers, Mum decided to make her own. Here's the recipe we arrived at this weekend.

Ingredients:
1/4 cup baking soda ($1.19 for a box)
1/4 cup arrowroot powder ($5.99 for 20 oz.)
4 tablespoons unrefined coconut oil ($6.00 for 15 oz.)
10 drops/shakes grapefruit essential oil ($9.99 for 0.5 oz.)
A tin or jar with lid

In a bowl, stir together dry ingredients, then add oils gradually until you like the consistency, mixing with a fork. Store in a closed container at room temp. (If the mixture seems too soft, try refrigerating it for a bit to firm it up.)

To apply, scoop up a bit with your finger, hold it against your skin for a couple seconds so it melts a little, then rub around.

The recipe above should last 4 or 5 months. We bought all the ingredients at Whole Foods. A jar of coconut oil is shelf stable for two years, who knew? So this stuff ought to provide a couple years' worth of deodorant. Try using any essential oil scent you like, but pick something that smells good mixed with coconut—the coconut oil contributes scent, too.

Update: Mum sent some notes to address questions in the comments.

August 09, 2011

How to make your own perforations

The Needle Shop, a lovely DIY sewing school and fabric store in Chicago, hired me to design a flyer they could post to advertise their sewing classes. Something budget-friendly and simple, but a step up from the raggedy "free puppies" notices tacked up at the grocery store. You know the type: people tear off phone numbers from the bottom and after a few have been taken, the notices start to look like they've been gnawed by rats. We can do better! Let's perforate those tear-off strips.

The pink design was selected and printed at Uprinting.com. Then, since The Needle Shop loves DIY projects, I proposed a couple easy ways to perforate the flyers—saving them the money a printer would charge to finish these.

One option is to sew a line of stitches with an unthreaded sewing machine. The needle makes punctures in the paper that help it separate more easily.

Another option is a rotary perforating blade. These are similar to the standard blades in rotary cutters, but the edges are notched. They make a series of dashes in the paper.

I hunted around online to find a 45 mm perforating blade that fits rotary cutters used for trimming fabric. I have a Fiskars cutter and an Olfa cutter. I couldn't find anything made by either of those manufacturers, but the We R Memory Keepers blade (a mere $2.18!) works with standard 45 mm cutters.

To use it, just place a ruler along the line you want to perforate and roll the blade along it. Works like a charm.

Here's the perforating blade compared to the sewing machine. (Click the photo to view larger.) The blade gives a much easier, cleaner tear, but the sewing machine is definitely better than nothing.

You could make your own coupons, tickets, invitations, and more. I'm fighting the urge to perforate everything in my house.

May 22, 2013

DIY printed tote bag using the sun


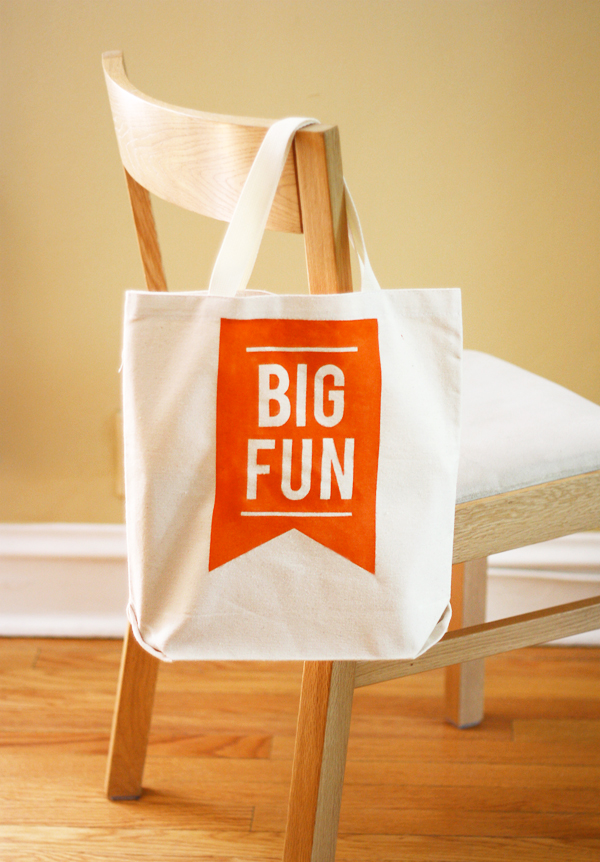
I added a design to a blank tote bag using light-sensitive Inkodye and a stencil cut from freezer paper.


Inkodye is a water-based dye that works on natural materials like fabric and wood, and develops its color in the sun. It dyes fabrics permanently, and I like it better than fabric paint since it soaks into the fabric and keeps it soft and flexible, unlike fabric paints that can be stiff and sit on the surface of a textile. Plus, it's really fun watching the color develop!


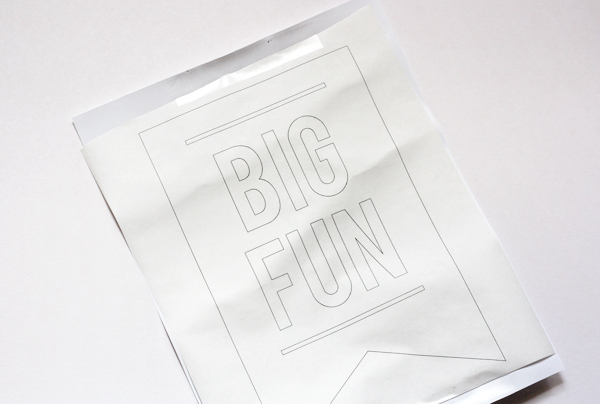
To make a similar tote, you can create your own design or download the Big Fun stencil I made.

Print the design and trace it onto the dull side of plastic-coated freezer paper, available at grocery stores. Or, save yourself a step and print directly on freezer paper cut to fit through your printer. Tape a piece of freezer paper, shiny side down, to a sheet of copy paper and print on it. It will come out a bit curly and lightly fused to the carrier sheet if you use a laser printer like I did, but it should peel off easily.


Cut out the letters and shapes. Remember that any empty hole will get filled with color, and no dye will go where the pieces of paper sit.

With an iron set to the appropriate temperature for your fabric (likely the cotton setting), iron the paper pieces to the tote, shiny side down. The iron will very slightly melt the plastic coating, sticking the paper to the canvas. Give the pieces an initial quick, light press to make sure they're where you want them. If not, peel them up and reposition. Then press down firmly with the iron and make sure all the edges are sealed so no dye will seep under them. Once they're stuck down, the pieces are really stuck, and will probably tear if you try to peel them off.

If there are any areas you're worried about getting dye— you know, if you tend to lose your mind a little and start painting outside the lines— mask those off with painter's tape. Place a piece of freezer paper inside the tote to prevent any dye from soaking through to the back side.


Then, in a dimly lit room, brush on Inkodye with a foam brush. Or any kind of brush or roller will do the job! Try for even coverage. The fabric doesn't have to be completely saturated; you just need a nice even coat on the surface of the textile.

(You can mix Inkodye with water to make it go further, if you like. A 1:1 ratio of dye to water will still yield maximum vibrance. Add more water to make pastels, or mix colors as you would paint.)


Blot off any excess dye with a paper towel.


Place the tote in the sun. The color will start to develop instantly! Here's the tote after 30 seconds, a minute or two, and fully exposed after 10 minutes.


Peel off the paper, my favorite part.


If you like, you can wash the tote with laundry detergent to remove any excess dye. Or just let it air dry and call it a day.


September 26, 2012

DIY cards with copper foil

Recently I ordered some laser toner reactive foil. It's metallic foil that will adhere to the toner on laser prints when it's heated and pressed. Or maybe it's not truly foil. I showed this experiment to my packaging-engineer husband who told me it was probably "metalized film" and blah blah blah "metal vapor deposition" blah blah, but "don't quote me on that." No problem; I didn't understand a word he said anyhow.

For best results, you're supposed to print a black and white laser image, then run the print and the foil through a hot laminator. But I don't have a laminator. The Designer Co-op suggested it's possible to use a household iron— an irresistibly tantalizing thought.

So I printed some designs I made, then practiced ironing on the foil. After some dismal early results, I gradually got the hang of it. I managed to produce one absolutely perfect transfer, and several towards the end were acceptable too, with only a couple small specks where the foil didn't adhere. I'm pretending these are vintage seals with an intentionally distressed look. It's a style choice. (Designers are taught in school to rationalize everything.)

Here's part of my trash pile:

The process that worked best:

I laser printed my designs in black onto cardstock using my home printer.

I laid a piece of corrugated cardboard on my dining table, and then a smooth piece of chipboard on top of that. Don't use an ironing board; it's too squishy. You'll need a hard surface like a table or floor, especially one that you would be very sad to ruin. It adds to the excitement.

I placed the laser print on top of the chipboard, printed side up, then covered the printed area with a piece of foil cut slightly larger than the design. The shiny side faces up.

After experimenting, the best setting for my iron was #2 for nylon. A too-hot iron will cause the foil to shrivel up like a piece of peeled sunburn. See that chunk on the right in the picture above? Bad. No color will stick to the paper. I found that a lower setting worked better. Make sure the iron's steam is turned off, too.

Starting at one edge, move the iron steadily across the foil at a moderately slow speed, pressing really hard. Make just one pass.

Then peel the foil sheet off. Hopefully the metal has stuck to the print nicely.

I'd added some vertical lines as a background in the design above, but decided I liked the seal better by itself.

Here's a transfer that's not too bad. You can see just a few black specks where the foil didn't stick. Click to view images larger.

I used metallic copper foil available from Decal Pro FX— one of the individual flat packs at the bottom of the page. An 8"x15' piece of foil is $8.95.

If you don't have design software, no worries. Even simple text printed in an interesting typeface would look cool in foil. It's lots of fun!

Update: I've discovered foil sticks better to coated paper than uncoated. And even better than an iron, I found a laser printer works pretty well to adhere the foil. See this post!